Showing posts with label paper cards. Show all posts

Monday, February 9, 2015

Make it Monday - V-day Cards

Yep! You read that right. Cards! I recently purchased two paper packs. One is 6 x 6 paper and one is 4 x 7 paper. They have no particular theme which makes them perfect for everyday card making. I was inspired when I found three pieces of "heart" papers inside. There was one more that was blue and green, but it remained unused. It would work perfectly for a more "manly" love card. I may make one since I have two men in my life that I love and who I appreciate.

These cards are pretty fast. Once you get the hang of making cards, they come together very quickly. Cut all the mats at once. And have everything at hand. You do NOT need a lot of things to accomplish professional looking cards. I do not have much in the way of stamping materials, but I do purchase some every once in a while. Think outside the box!

Let's get to the project.

Materials
Paper cutter
Scissors
Roller tape
Pop dots
Ribbon
Glitter tape
White card stock for card bases
Red and Pink card stock for Layer 1
Pattern paper for layer 2
Small amount of white card stock for stamps
Love themed stamps
Small amount of red and pink card stock for stamp mat
Rhinestones

Here's the dimensions

Card - 4 1/4 x 5 1/2 when folded. Meaning 8 1/2 x 11 card stock cut in half.
Layer 1 - 4 x 5 1/4
Layer 2 - 3 3/4 x 5

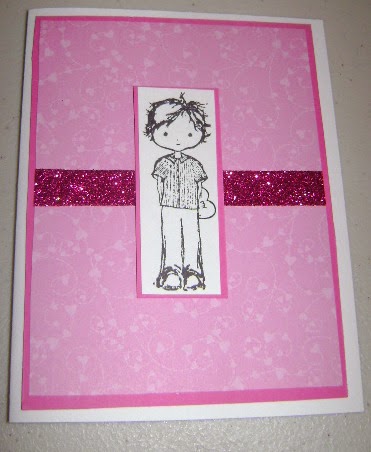
I used 1 red Layer 1 and 2 pink layer 1. I also used three different Layer 2 pattern papers. All of them have a love/heart theme. I used 1 red stitch ribbon measured to around 12 inches. I used 2 pieces of glitter tape measured at 4 and 5 inches. The stamping I measured as I did it. This will vary for you based on the stamp you used.


Here's the first mat completed. This is the red version with red heart pattern paper and stitched red ribbon. 


This shows the pop dots I used to put the stamp on the mat.


Here's the finished product.

Because the layers and bases of this card are the same, I am not going to show the other three cards being made. I am going to show you the finished versions. So here's the other two cards.


(Prima Stamp)


(Sentiment Stamp)


These cards were fun to make and suit my "love" of pink. What are you crafting for V-day?

Sarah

Thursday, February 5, 2015

Throwback Thursday - The Color Chocolate

There is something about the color brown that pulls at my tension and allows me to just relax around it. Perhaps it is the connection between chocolate (the candy) and the chemical reactions it gives to humans that creates that relaxation. What I know is that I am the type of girl that loves chocolate and Tiffany blue together. So much in fact that my living room and bedroom have those color themes. 

When I make cards, I usually try to find a theme. It could start with the first layer color or a piece of ribbon. The Throwback card I am sharing today is one that I made around a stamp. I found this stamp and a few others in the clearance section of JoAnn's online. It was when I first started stamping. I instantly fell in love with the hand drawn feel of it. The lines are so delicate. And it just fit.


So I used the owl as inspiration, but stuck to creams and browns as my color theme. As you can see, it turned out to be a good choice. Chocolate on Chocolate on cream filled chocolate. This is my chocolate share for the week.

What is your go-to colors?

Monday, April 28, 2014

Make It Monday - 2 Autumn Cards

Were you excited when you saw the preview on Saturday? I couldn't believe how cute they turned out. I plan on sharing another card I made using a Jack N Jill set soon. The goal of my Make it Mondays is simply to work on increasing my stock or other business ventures for the upcoming fair/sale season. Feel free to use the search bar to the right to search for my previous Make it Monday posts.

Before I go any further, please be aware that I am not a professional card maker. I am not a consultant. I make cards because I like to and as a beginner. This tutorial is at a beginner level.

This week is 2 in one! Yep, using the same stamps and same paper I am creating two different looks. Here's the preview: 


Material List
  • White cardstock
  • Brown cardstock
  • Cream cardstock
  • Colorbok Luxe Designer Paper
  • Jack N Jill Stamp set - by Prima Marketing
  • Autumn Sentiment stamp set - by Inkadinkado
  • StazOn Ink pad in Timber Brown
  • Tim Holtz Distress Ink pad in Walnut Stain
  • Pop Dots
  • Snail glue - or whatever adhesive you want to use
  • Gold Glitter Ribbon
  • Scotch tape

As you can see in the photo above, there are two different sizes of cards. I will post the dimensions for each card.

Card one - Side Open
Dimensions of card cut and folded - 5 1/2 x 4
Mat in brown - 5 1/4 x 3 3/4
Designer paper mat - 5 x 3 1/2
(This card was cut in half on the long side. Almost, I do not have a cutter that breaks down further than 1/4.)

Card two - Top Open
Dimensions of card cut and folded - 5 1/2 x 4 1/4
Mat in brown - 5 1/4 x 4
Designer paper mat - 5 x 3 3/4
(This card was cut in half on the short side.)

Stamp Mats In brown
For Jill - 3 1/4 x 1 1/2
Sentiment - 1 1/4 x 2 1/2

Stamp Mats in cream
For Jill - 3 x 1 1/4
Sentiment - 1 x 2 1/4

First, I gathered all the materials together so I did not have to struggle to find something. I cut the cards and mats at the same time. 

*Note: My cutter is a little weird and leaves fibers on the sides of the cuts, so I trim when I see issues. My dimensions do change when I trim. 


After cutting the mats, Cut the ribbon and used two pieces of tape and attached the ribbon to the side open card.


You can see how I accomplished that in this photo.


Add the designer paper to the brown cardstock mats by using snail glue.

Not pictured: Stamp the images to the cream cardstock and attached them with snail glue to their respective mats.


In this photo, I was attempting to figure out where I wanted the images to sit. You can change the layout to fit what you want.


Attach the backings to the card base.


Add pop dots to each of the stamped images.


Place them in the correct position.


Stamp a secondary sentiment inside the card. This is optional, but I think it matches the card.


I did not notice until afterwards that the sentiment inside matches the choice of ribbon, but it goes well together!


What do you think of this week's Make it Monday?

Card making is so versatile! I found it easy to create two similar cards with one set of materials. Yet, they look different and appeal to a different set of people. I would love to see any photos or creations you make from this tutorial. You can share them via email at smchatton.writer@gmail.com or on my Facebook page - https://www.facebook.com/DandeCreations. Who knows! You may find your creation (with your permission of course) on the Share it Saturday post.

Happy Crafting!
Sarah

Saturday, April 26, 2014

Preview - Make it Monday

Well, Monday is almost upon us and that means another "Make it Monday!" This week, I had to think of what I could use around the house to make something that would be useful for my upcoming fair/sale season. As I have been really interested in making a) cards, b) crochet, or c) wooden sleds, I decided to choose A for the upcoming Monday. So, for the first time I am posting a semi-okay card tutorial - on Monday of course. Today, I am just providing a quick preview.


Aren't they just cute? I just purchased both of these stamp sets on Ebay and couldn't wait to try them. For the longest time, the only sentiment sets I had were Christmas. I am very glad to now have some new Autumn type sentiments. Also, look at the little girl! She is part of the Jack and Jill line. I just found it and fell in love immediately.

(Forgot to post when published)

Materials List

  • white cardstock
  • brown cardstock - mat
  • Colorbok Luxe Designer Paper
  • Jack N Jill Stamp set - Prima Marketing
  • Autumn Sentiment - Inkadinkado
  • Cream cardstock
  • StazOn Timber Brown Ink pad
  • Tim Holtz Distress Ink in Walnut Stain
  • Pop dots
  • Snail adhesive (or whatever you want to use)
  • Gold glitter ribbon
  • Scotch tape


Have a wonderful day!
Sarah

Friday, April 18, 2014

Some New Cards

With a week off, I have been attempting to get a little bit of everything done. I am watching my seedlings grow. Working on the containers that are out on the porch. But the best thing I have done this week is work more on my products for Fall. I have a project to show you tomorrow that is particularly fun. For today, I just want to share some of the cards I came up with this week. Yes, some of them will have similar stamps. There happens to be two or three I really love.


I have gotten a few new toys including a cloud embossing folder. So far, I have only made one or two designs with it. I plan to add more. I also have four stamp sets on the way including a cute little Jack and Jill combo that might become my favorite stamps. I cannot wait to try them.

The goal this week is using leftovers and scraps to make cards. In the space of just a little bit, I have a stack of scrap paper really high! They are turning out nicely I think.

Have a great Friday!
Sarah

Sunday, April 13, 2014

Inky Rainbows

A few months ago when I decided to try paper crafting, I found a technique I was interested in trying. It involved pigment ink, a dauber, a white wax crayon, a stamp, and a piece of white card stock. The idea was that you stamped a certain image onto the white card stock and used the white crayon to cover up the area you did not want colored. I tried with an owl stamp. I covered up the face and began rubbing the stamp with purple and yellow ink. I found that the ink did not quite work as well as I thought. The purple bled and the yellow did not.

What I realized is that I REALLY enjoy the technique without using the crayon. I began experimenting with just a piece of white card stock and pigment ink. The result was a great, bright background. Here's some examples:


If you would like a photo tutorial, let me know!

Do you have any unique techniques involving ink?
Sarah

Busy! Busy!

On my usual errand day, I picked up two new packs of designer papers for paper crafting. I knew I needed to add some new cards to my stock. There was a good 50+; however, I wanted to spent time with new knowledge and ideas to create a better set of cards. For the past few days, I have been crafting up a storm. Here's a preview:


It is my hope to get as much stock built as I can before fall...including my cards.

What do you think? Any suggestions?
Sarah

Friday, April 11, 2014

Preparing for the Fall

Unless you are a crafter who participates in craft fairs, you may not realize the amount of work that happens or that is necessary to fully prepare for a fair. Sometimes there is so little time between each fair that stock is almost impossible. So, this crafter has began working on stock items.

Last year, I chose to start making paper cards to add to my stock. The first few were very not that great; however, I would like to say that I feel like I am slowly getting better at making cards. This morning I purchased two new paper books that are pretty fantastic. I spent time making 8 cards to include in my fall booth that I wanted to share.

Please know that I am not a professional card maker. I do it because I enjoy it, but I am still learning.


Minus the solid colored paper, the rest of the paper was purchased this morning! I LOVE these. I assure you that they look better in person.

Do you papercraft?
What do you think?
Sarah