Showing posts with label Projects. Show all posts

Sunday, September 13, 2015

Revealing the Theme - National Hat Month

Hello Readers! Who would have thought that we would have so many things to celebrate in our life time? As I searched these events, I was so shocked at the sheer amount of things to celebrate. Then, I found something that matches the crafting theme so well - National Hat Month!

Yep! National Hat Month seems like the perfect opportunity to make September all about hats. Unfortunately, I found two non-hat weekly themes that prevent this from being a complete hat week. Do not despair! I have tons of hats to share with you this week.

The material list is pretty easy for this week's Make it Monday.

Materials:
Worsted Weight Yarn
Size H hook
Scissors
Yarn Needle
Stitch Marker (optional)

See, super easy!.

I did choose to use Caron One Pound Baby in Denim for my hat. I cannot wait to show you the results of my Make it Monday project.

See you tomorrow,
Sarah

Thursday, February 5, 2015

Throwback Thursday - The Color Chocolate

There is something about the color brown that pulls at my tension and allows me to just relax around it. Perhaps it is the connection between chocolate (the candy) and the chemical reactions it gives to humans that creates that relaxation. What I know is that I am the type of girl that loves chocolate and Tiffany blue together. So much in fact that my living room and bedroom have those color themes. 

When I make cards, I usually try to find a theme. It could start with the first layer color or a piece of ribbon. The Throwback card I am sharing today is one that I made around a stamp. I found this stamp and a few others in the clearance section of JoAnn's online. It was when I first started stamping. I instantly fell in love with the hand drawn feel of it. The lines are so delicate. And it just fit.


So I used the owl as inspiration, but stuck to creams and browns as my color theme. As you can see, it turned out to be a good choice. Chocolate on Chocolate on cream filled chocolate. This is my chocolate share for the week.

What is your go-to colors?

Saturday, October 4, 2014

Clothespin Snowflakes - Photo Heavy

I recently saw a pin on Pinterest for a cute and inexpensive ornament that had my heart aflutter. Snowflakes, snow, and snowmen are my most favorite ornament and Christmas decoration out of everything. I can pass up Santa for a good snowflake! So when I saw this cute little pin, I knew I had to try it. I already had the glue sticks. I had the ribbon. All I needed was the clothes pins!

A few weeks ago, I found myself in the craft section of my local Walmart looking for clothespins. They had a set of 18 or so for almost 4 dollars. That makes this project less budget friendly. So I headed to the laundry section to see if they had a better pack for cheap. They did! A 50 pack for about $0.97. That is more than budget friendly as I could pick up 3 packs of 50 for the price of 1 in the craft section.

Materials:
50 pack of Wooden Clothespins from Walmart ($0.97)
Glue sticks (In stock)
Glue Gun (In stock)
Ribbon (In stock, but cost $1.00 per spool)

Optional: paint, glitter, craft glue, paint brushes


Now, for the instructions. I will be posting a set of pictures with the instructions below it. Please view all the instructions before beginning the project.


Here's the materials. I chose to not use paint and glitter, although I am looking into adding that later.


Twist the clothes pin until the twisted one pops out the spring.


Lay the one side off and pull off the spring.


It should be relatively easy. I have no use for the spring, so I just toss them.


Now you are let with both sides. Lay the sides with the straight sides up. Make sure the cut outs are facing the same way.


Place a line of glue along the pin.


Now that it is on, place the two sides together. Match up the cut out.


Here you can see what the glued pin looks like.


Tie the ribbon. I am going to show pictures of how I do it, but feel free to do it how you feel comfortable.


I actually added my ribbon into the pin as I glued it for the most stability. It is about an inch from the top of the pin.


Next, add some glue to the bottom of one pin and attach another completely opposite.


In the center, add another bead of glue and attach another pin.


Repeat for the other side.


Now, in each area between two pins, add glue and another pin. I did have some issues getting the pins to completely adhere due to the angle, but I just added some glue up the sides so the angles attach.


Here's the completed snowflake.


From one half of the package, I got three snowflakes. These are unpainted, but still beautiful.

One thing I would caution you about is that the glue does snow, but can be covered with paint and glitter to mask. I do not have a problem with the view of paint, but some may. The original pin shows these snowflakes stained as more of a vintage look. What I say is to do what you like with them!

In about 30 minutes, I had all three completed including taking photos for this post! That is a quick and inexpensive ornament. The cost breakdown is below.

Costs

8 clothes pins  -   $0.16
1/2-1 hot glue stick   -   $0.10
Hot glue gun  - free
Ribbon     -$0.16
_____________________
Total Cost - $0.42


Each pack of wooden clothespins (50) can make 6 snowflakes.

Happy Crafting
Sarah

Monday, April 28, 2014

Make It Monday - 2 Autumn Cards

Were you excited when you saw the preview on Saturday? I couldn't believe how cute they turned out. I plan on sharing another card I made using a Jack N Jill set soon. The goal of my Make it Mondays is simply to work on increasing my stock or other business ventures for the upcoming fair/sale season. Feel free to use the search bar to the right to search for my previous Make it Monday posts.

Before I go any further, please be aware that I am not a professional card maker. I am not a consultant. I make cards because I like to and as a beginner. This tutorial is at a beginner level.

This week is 2 in one! Yep, using the same stamps and same paper I am creating two different looks. Here's the preview: 


Material List
  • White cardstock
  • Brown cardstock
  • Cream cardstock
  • Colorbok Luxe Designer Paper
  • Jack N Jill Stamp set - by Prima Marketing
  • Autumn Sentiment stamp set - by Inkadinkado
  • StazOn Ink pad in Timber Brown
  • Tim Holtz Distress Ink pad in Walnut Stain
  • Pop Dots
  • Snail glue - or whatever adhesive you want to use
  • Gold Glitter Ribbon
  • Scotch tape

As you can see in the photo above, there are two different sizes of cards. I will post the dimensions for each card.

Card one - Side Open
Dimensions of card cut and folded - 5 1/2 x 4
Mat in brown - 5 1/4 x 3 3/4
Designer paper mat - 5 x 3 1/2
(This card was cut in half on the long side. Almost, I do not have a cutter that breaks down further than 1/4.)

Card two - Top Open
Dimensions of card cut and folded - 5 1/2 x 4 1/4
Mat in brown - 5 1/4 x 4
Designer paper mat - 5 x 3 3/4
(This card was cut in half on the short side.)

Stamp Mats In brown
For Jill - 3 1/4 x 1 1/2
Sentiment - 1 1/4 x 2 1/2

Stamp Mats in cream
For Jill - 3 x 1 1/4
Sentiment - 1 x 2 1/4

First, I gathered all the materials together so I did not have to struggle to find something. I cut the cards and mats at the same time. 

*Note: My cutter is a little weird and leaves fibers on the sides of the cuts, so I trim when I see issues. My dimensions do change when I trim. 


After cutting the mats, Cut the ribbon and used two pieces of tape and attached the ribbon to the side open card.


You can see how I accomplished that in this photo.


Add the designer paper to the brown cardstock mats by using snail glue.

Not pictured: Stamp the images to the cream cardstock and attached them with snail glue to their respective mats.


In this photo, I was attempting to figure out where I wanted the images to sit. You can change the layout to fit what you want.


Attach the backings to the card base.


Add pop dots to each of the stamped images.


Place them in the correct position.


Stamp a secondary sentiment inside the card. This is optional, but I think it matches the card.


I did not notice until afterwards that the sentiment inside matches the choice of ribbon, but it goes well together!


What do you think of this week's Make it Monday?

Card making is so versatile! I found it easy to create two similar cards with one set of materials. Yet, they look different and appeal to a different set of people. I would love to see any photos or creations you make from this tutorial. You can share them via email at smchatton.writer@gmail.com or on my Facebook page - https://www.facebook.com/DandeCreations. Who knows! You may find your creation (with your permission of course) on the Share it Saturday post.

Happy Crafting!
Sarah

Thursday, April 24, 2014

Throwback Thursday

Don't judge, but I am apparently on a Christmas kick. Yes...by the end of the year I will be entirely tired of Christmas and spent about 3-4 months not thinking about it until the realization that I am a) a crafter and b) me and thus, start working on projects, gifts, and products so I will be done early. I know! Exhausting.  But any good craft can tell you that getting things done early is better than scrambling last minute to accomplish a huge goal. My goals for Christmas? HUGE! Thanks to a large family. LOL!

Well, this week I wanted to share with you something that I really enjoyed doing and the story behind it. My mother LOVES handmade gifts. What mother doesn't? I know without a doubt that I can spent an afternoon or a weekend creating a handmade ornament in the first experimental phase with my mother loving it from the moment she sees it. Maybe it is a mother just bolstering her child. I highly doubt it though. Two years ago it was crocheted snowman ornaments. Last year, it was medallion ornaments.

When my husband left the Navy in 2010, we ended up staying with my parents for around 4 months as we had to move states and such. It was Christmas in July (crafter's paradise) and I wanted to start on my gifts. This was before I was selling. As a stress relief, I chose to make my mother something special. Since as long as I could remember, my mother would use a plastic tree skirt that would threaten to fall apart every year. Tradition yes, practicality, no. So that was my goal - a crocheted tree skirt.

Before that time, I had never made one. So I spent a few hours searching for a pattern that was simple, within my skill range of the time, and would be finished in time. Without fail, I found a good single crochet tree skirt that I could change the colors on (Red, Green, and White). I would stay in the room we were staying in attempting to crochet on this tree skirt without notice. Once I heard someone coming, I would scramble to put it away fast enough so the gift would be a surprise. The smile on her face was the best present of all.

I unfortunately cannot find the picture of it finished and around the tree; however, I have a picture of it almost finished.


Last year, I finally created a tree skirt for my own family in deep red, dark green, and white. It was a great experience. Slowly, we are moving away from commercialized gifts and products to handmade and local!

Do you have a similar story?
Sarah

Friday, April 11, 2014

Preparing for the Fall

Unless you are a crafter who participates in craft fairs, you may not realize the amount of work that happens or that is necessary to fully prepare for a fair. Sometimes there is so little time between each fair that stock is almost impossible. So, this crafter has began working on stock items.

Last year, I chose to start making paper cards to add to my stock. The first few were very not that great; however, I would like to say that I feel like I am slowly getting better at making cards. This morning I purchased two new paper books that are pretty fantastic. I spent time making 8 cards to include in my fall booth that I wanted to share.

Please know that I am not a professional card maker. I do it because I enjoy it, but I am still learning.


Minus the solid colored paper, the rest of the paper was purchased this morning! I LOVE these. I assure you that they look better in person.

Do you papercraft?
What do you think?
Sarah

Monday, April 7, 2014

Make it Monday: Photo box

One of the  things that is time consuming in a crochet (or any hobby business) is setting up and taking photographs. As I mentioned previously, I am in the process of retaking photos and remaking items so that I can create better photos. The little Easter set-up for Barbie was not as difficult to make; however, it was time consuming taking multiple photos of one item, hoping the light was right, struggling to get the Barbie to stand right...you name it, it took forever.

While I am happy with the way that particular set of photos turned out, I wanted to create a space that was specifically for photographs with a white background and bright lights. Ultimately, I wanted no distractions and a bright pop for my items.

As I was searching for blueprints for a wooden photo box, I came across a bit of a cheaper version. You can view the instructions here. That was up my alley! Cheap, easily made, and did not require large tools that I would have to borrow. So, my goal for Monday is to pick up two desk lamps and some foam board to make this.

My budget: 30 dollars

Here's the breakdown

Foam board: $1.00 a piece
Total: $5.00
-Found at my local Dollar General

Razor cutter: $0.00
I have three at home.

2 Desk Lamps: $10.97
-Found at Walmart. One of which was in clearance for $5.00 and a clip-on for $5.97.

Tape: $0.00
-I have a roll of duct tape at my house.

White Printer Paper: $0.00
-Also have (But didn't use, yet)

Digital Camera $0.00
-Have it

As I am the type of girl to read instructions and then take my own path, I chose to use 20 inch measurements and cut 4 of the 5 boards down to that.

This is the 4 out of 5 cut down.

 Then, I started to cut the tape and assemble the pieces edge to edge. Now, with one person this is doable; however, I did start to get frustrated when things started to fall down. I used the wall as a support. When I completed the four out of 5 pieces, I attached the bottom. It helped to stick the tape to the edge of the desk and have it ready.


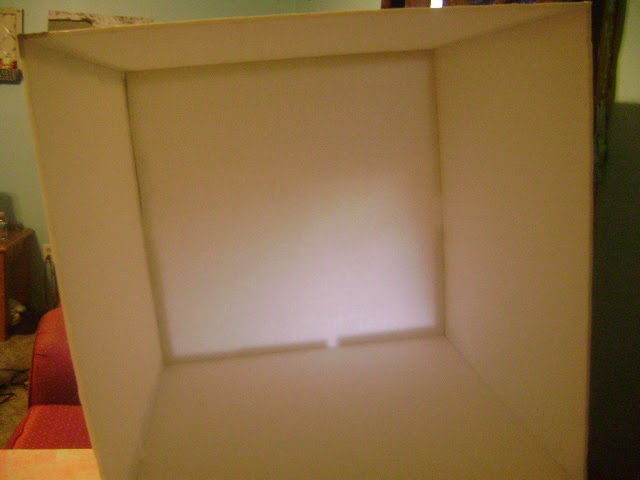
Unlighted and no flash on the cube! You can see the tape.


With the flash, you can no longer see the tape, but you can see the seams.


The finished setup. These are the lamps I found really cheap and on clearance.

I would have to say that I accomplished this box within a hour with minimal frustration. The ease of completing it was pretty nice. As you can see, it is a cheaply made photo box; however, at the price of 5 dollars and a little tape you have a somewhat, well lit photo box. In the next week, I plan on putting something along the seams to fix it.

Now, you know I did not just take a photo of the box and move on! I had to try it on one of my products. I have to say, straight up I would normally have something under this item to lift it up as it photographs better that way. I used every function on my camera (not an expensive one) to take photos and see the results. When I found one that looked good with the lights on, I took it with the lights off and flash. Here are the results:


Without lights/flash, before edit


Without lights, after edit


With Lights/Flash, Before Edit


With Lights/Flash, After Edit


As you can see by these pictures, the clarity on the edited with lights photo is far superior to the others. Even without the lights and with a flash, the clarity and color does not come close to popping like the final picture!

Total Cost without tax: $15.97

If you need a photo box and need one on the cheap, I would highly suggest this type. Note: If you do not have the materials I do, this will cost you more. The box cutter and tape are not that expensive; however, the price will rise when you add other things.

THUMBS UP!

What do you think of the photo box?
Are you going to try to make one?
Sarah

Saturday, April 5, 2014

The Essence of What I do

There was something weighing on my mind last night and the last few months. Something large that seems to be pushing at my soul. It's about my life, my passions, and about my business. I have struggled like many other small business owners in this economy. I have struggled with other crocheters undercutting my prices or offering the same items. For months, the struggles I faced trying to build up a reputation as a good designer and as a good seller seemed to bring me down further instead of uplift me. The fear of not succeeding weighed me perhaps the most.

What if I spent all this money and no one buys?

What if I upgrade this and redo that with no interest?

What if my customers have no interest in my patterns or items?

As months went by, those stones in my basket became heavier and heavier to bare. I continued to doubt myself. I changed this thing and that thing to increase business. I offered deal after deal with not one bite.

Through all that, I continued to see a quote about how long it really took to build a business and a brand. How many hours, heartaches, struggles, changes, and frustrations it took to build a worth while business....

Last night, it dawned on me.

I do not crochet, craft, or write because of other people. I do not sell items. I do not sell my time, my materials, or even a bunch of yarn knots made with a metal hook. I make and sell memories. I make and sell a connection between two people that will last a lifetime. I make and sell heirloom ornaments and dolls...that will withstand more than a few weeks of play at Christmas time. I make and sell that smile exchanged between two people....and the hug...and the heartfelt gratitude.

Most handmade sellers do the same. When you factor in the fees, the listing amounts, the time, energy, material costs...even the gas to get the materials, some of us barely break even trying to keep up with trends and the "best" price.

Well, no more! I want to maintain the very essence of why I do what I do - the memories, the hugs, the laughter, the smiles, the connection, and the heirloom that touches more than one generation.

So thank you, for sharing that with me. It means more than you know!


With lots of love,
Sarah