Showing posts with label yarn. Show all posts

Monday, April 21, 2014

Make it Monday - Sled Ornament

I announced this pattern on Saturday as part of my "Share it Saturday" routine! But first things first, here is the material list again:


  • glue gun
  • glue sticks
  • popsicle sticks (9 - 8 for sled and 1 just in case)
  • sturdy scissors
  • paint color of choice
  • scrap paper or newspaper
  • paint brush
  • yarn/twine/ribbon


 While this is a REALLY early Christmas ornament, I am preparing my booth with products for Autumn shows. The goal I have is to have many choices to purchase and have fun while I make them. I saw pictures of a similar sled on Pinterest and developed my own.

*Note: While this is a somewhat kid friendly project, I would remind everyone to use safety goggles and allow an adult to deal with the hot glue.

*Note: Although this project is pretty quick, you must leave time to dry.

1. Plug in glue gun to heat up. Be sure to place it on a piece of scrap paper to catch any dripping glue.

2. Cut one stick into two equal parts with a small overage. Two of these parts will fit across the bulk of the sled.


3. Place 5 popsicle sticks next to each other with the middle stick the highest, the next layer down just slightly, and the last two down further.


4. Using hot glue, place a small line of glue near the upper part of the sled and place 1 of the support beams from step 2 on top. I squished mine down to create a better hold. Repeat further down the sled.


5. Place a small bead of glue on each support beams at the very end and place the runner, holding in place until the glue hardens. Repeat for opposite side.


6. Allow time to dry.

7. Using paint brush, paint the sled on one side. Let dry. Repeat on opposite side. Let dry.


8. After cutting the ribbon/twine/yarn to the desired length for the hanger, place a small bead of hot glue next to the top support brace on the underside of the sled. Quickly place one end of your hanger into the glue. Repeat on opposite side.


You can obviously embellish this sled how you want. I have ideas to put names and the year on the sled so that whoever receives the ornament will have a date for memories in the future. I would love to see any projects you do with this tutorial. You can send the photos to smchatton.writer@gmail.com or visit my Facebook page, Dande Creations, to share.

I found packages of popsicle sticks at my local Dollar General on sale 25% off. I bought 5 packs for $3.75. I did pick up a new pack of glue sticks a few weeks ago, but you hardly use half a stick for just one sled. I also had crochet thread to create the hanger; however, the price is very low with the amount you use. Paint was also relatively cheap. For me, it was free. I had purchased paint samples at Lowes when we painted our kitchen and it was the perfect time to use them. The beautiful, deep blue was a perfect winter-y/Christmas-y color.

Costs

8 Popsicle sticks - $0.08 on sale
Hot glue stick - $0.16
Thread - Free
Paint - $0.10
-------------
$0.34 per sled
Round up to $0.40 for thread (generous)

So for 40 cents, you have a sled.

My packs of sticks had 80 sticks so I can get 10 sleds from one pack! What a great, frugal way to make gifts for the holidays, crafts for the kids, or products to add to your holiday craft booth!

Happy Crafting,
Sarah


Thursday, April 17, 2014

Throwback Thursday

It is that time of the week when I show something that may bring a little embarrassment or shame. Perhaps a bit of reflection and thankfulness that I grew, quickly. That I learned a little bit that affected my abilities and skill set. This week is none of that. This week I want to reflect on something that has been a part of me...since birth apparently!


In the 80's, I was born! My mother, who is also a crocheter, took my photos in a lovely crocheted set of a hat, jacket, and booties! I wish that I had the set for the future mini me, but I do not. What I have is a gift! A knowledge that my mother crocheted a set of lovely clothes for me that set my future in motion. The picture that solidifies that emotion of connection.

Here I am, all these years later, a crocheter would loves to give crocheted pieces as gifts and who makes things to sell.

Reflecting....just a bit,
Sarah

Monday, April 7, 2014

Make it Monday: Photo box

One of the  things that is time consuming in a crochet (or any hobby business) is setting up and taking photographs. As I mentioned previously, I am in the process of retaking photos and remaking items so that I can create better photos. The little Easter set-up for Barbie was not as difficult to make; however, it was time consuming taking multiple photos of one item, hoping the light was right, struggling to get the Barbie to stand right...you name it, it took forever.

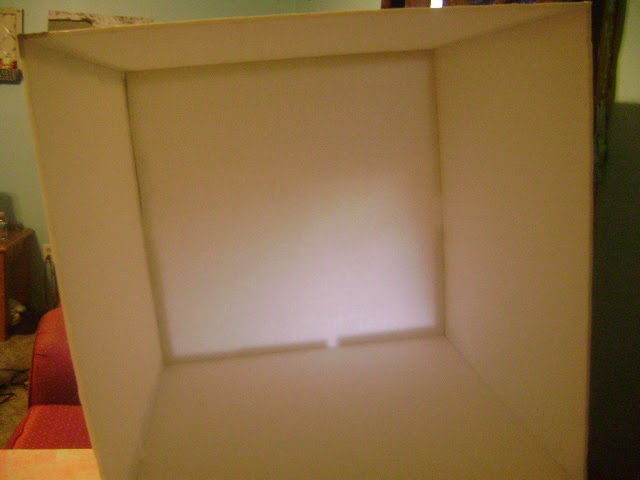
While I am happy with the way that particular set of photos turned out, I wanted to create a space that was specifically for photographs with a white background and bright lights. Ultimately, I wanted no distractions and a bright pop for my items.

As I was searching for blueprints for a wooden photo box, I came across a bit of a cheaper version. You can view the instructions here. That was up my alley! Cheap, easily made, and did not require large tools that I would have to borrow. So, my goal for Monday is to pick up two desk lamps and some foam board to make this.

My budget: 30 dollars

Here's the breakdown

Foam board: $1.00 a piece
Total: $5.00
-Found at my local Dollar General

Razor cutter: $0.00
I have three at home.

2 Desk Lamps: $10.97
-Found at Walmart. One of which was in clearance for $5.00 and a clip-on for $5.97.

Tape: $0.00
-I have a roll of duct tape at my house.

White Printer Paper: $0.00
-Also have (But didn't use, yet)

Digital Camera $0.00
-Have it

As I am the type of girl to read instructions and then take my own path, I chose to use 20 inch measurements and cut 4 of the 5 boards down to that.

This is the 4 out of 5 cut down.

 Then, I started to cut the tape and assemble the pieces edge to edge. Now, with one person this is doable; however, I did start to get frustrated when things started to fall down. I used the wall as a support. When I completed the four out of 5 pieces, I attached the bottom. It helped to stick the tape to the edge of the desk and have it ready.


Unlighted and no flash on the cube! You can see the tape.


With the flash, you can no longer see the tape, but you can see the seams.


The finished setup. These are the lamps I found really cheap and on clearance.

I would have to say that I accomplished this box within a hour with minimal frustration. The ease of completing it was pretty nice. As you can see, it is a cheaply made photo box; however, at the price of 5 dollars and a little tape you have a somewhat, well lit photo box. In the next week, I plan on putting something along the seams to fix it.

Now, you know I did not just take a photo of the box and move on! I had to try it on one of my products. I have to say, straight up I would normally have something under this item to lift it up as it photographs better that way. I used every function on my camera (not an expensive one) to take photos and see the results. When I found one that looked good with the lights on, I took it with the lights off and flash. Here are the results:


Without lights/flash, before edit


Without lights, after edit


With Lights/Flash, Before Edit


With Lights/Flash, After Edit


As you can see by these pictures, the clarity on the edited with lights photo is far superior to the others. Even without the lights and with a flash, the clarity and color does not come close to popping like the final picture!

Total Cost without tax: $15.97

If you need a photo box and need one on the cheap, I would highly suggest this type. Note: If you do not have the materials I do, this will cost you more. The box cutter and tape are not that expensive; however, the price will rise when you add other things.

THUMBS UP!

What do you think of the photo box?
Are you going to try to make one?
Sarah

Friday, October 7, 2011

A Finished Project

So, one of my old high school friends decided she wanted a doll for her daughter from an Amigurumi doll pattern I linked on Facebook.  And...it is done.  Below is the finished project.


This, of course, is not my pattern.  I found it one day on this website: http://stitch.hellooperator.net/free-patterns/amigurumi-doll/amigurumi-doll-pattern-charts/.  I am very thankful I found this.  It is super cute doll!

Luckily, I have one more doll in works for a Christmas present to my little niece Ada.  :) I hope she will love it.  I took a different approach to the second doll though.  I choose a white yarn for the face, legs, and arms.  For the outfit, I chose the a blue and brown variegated yarn.  I also took a different approach to the eyes since my niece is around a year old.  I crocheted a magic ring circle with two rows (12 sts).  Pictures will be posted when I finish it.

Just to mention: I did not sell this pattern or the finished doll.  All copyrights reserved to the rightful author.