Showing posts with label Another Scrappy Project. Show all posts

Saturday, February 7, 2015

Another Scrappy Saturday - A Chocolate Colored Card - Photo Heavy

Let's face it. The last two months of 2014 had us faced with the temptation of calorie laden foods. Then January hit and we were (hopefully) able to get back into the swing of proper eating. And then bam! February hits and every store is laden with more tempting chocolates and candies for a holiday about Love. So when the first week of February ended up being themed chocolate, I had no clue I would be caving and doing a special Food edition of Make it Monday to break the cycle of normal calorie intake! So in an attempt to reign that crazy haired, crazy eyed, Chocolate maniac in, I am going to make a card for Scrappy Saturday.

A chocolate colored card. One without calories. In fact, it burns calories!

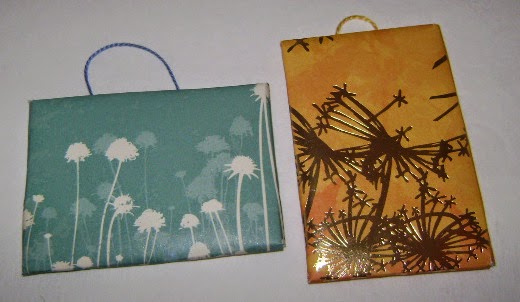
The inspiration is the wrapper of a chocolate bar. The sentiment and stamp was chosen to match a Dove chocolate piece that has an inspirational saying inside. (I so love Dove milk chocolate. Yum!)


Materials:
A paper cutter
Scissors
Roller Tape
Scott's Magic Tape (transparent or similar brand)
Acrylic block
Stamp set
Staz-on Brown Ink
Tim Holtz Distress ink in Walnut
A sponge (I use a makeup sponge - super cheap.)
Silver or gold thread
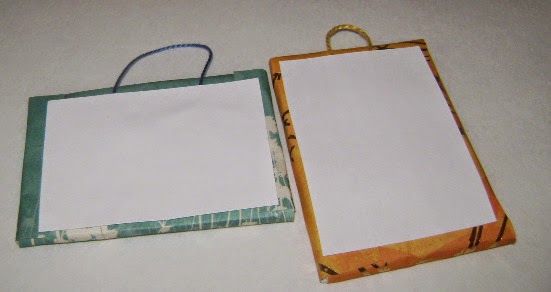
1 card base (white)- 5 1/2 x 4 1/4
Layer 1 (tan) - 5 1/4 x 4
Layer 2 (designer paper) - 5 x 3 3/4
Scrap piece of white paper
Scrap piece of tan paper for stamp mats


Remember: The stamps I use or the paper is relatively easy to change for what you have on hand. Use this as a guide.

Before starting - I cut all my papers and base to have them ready.

1. I started by stamping my sentiment and stamp on white card stock. I always stamp on a larger sheet and cut them out by hand.


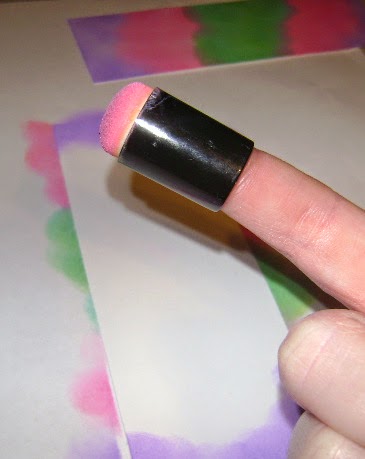
2. Using Tim Holtz, Walnut Distress ink, I sponge around the outside edge of both stamped images to create a contrast on the tan background.


3. Adhere (roller tape) the stamped images to the tan background, and hand cut them out.


4. Here they are cut out.


5. Using a piece of Scott's tape, adhere the gold (or silver) thread onto the back of the designer paper.


6. Wrap it around how many ever times you wish. I chose five. Once you like the look, cut the thread and attach with another piece of tape on the back.


7. Using roller tape, attach Layer 2 to Layer 1. Then attach with roller tape to the card base.


8. Using pop dots or foam tape adhere your stamps to the front. I positioned my flower near the center of the card with the sentiment at the bottom. You could easily adhere the flower in the center and use the sentiment inside.


And that is my chocolate inspired card. Who couldn't use a push to enjoy life's moments? We all get lost in life sometimes. Having a push in the right direction is great!

Happy Saturday!
Sarah

Saturday, January 31, 2015

Another Scrappy Saturday - Pigment Ink Bookmarks

Last Scrappy Saturday, I showed you how to embellish your bookmarks with some ribbon. The bookmarks shown in that post is what we are accomplishing today. I made these bookmarks before Christmas because they were a gift for two of my nieces. They fit into the theme of our week. Inspire Your Heart with Art.


The stamp used in these bookmarks is a flower with tons of hearts. Plus, I used the same technique as shown in Make it Monday! So you could easily make these two projects together and give a nice gift to someone who could use a pick me up.

Materials
Paper cutter or scissors
Ruler
Pen (if you don't use a paper cutter with a ruler attached)
Purple card stock
White card stock
A sheet of white copy paper
Sponge Daubers
Pigment ink
A stamp if you want that
StazOn Jet Black ink (for stamp)
Acrylic block (for stamp)
Roller Tape

1. Begin by cutting the purple card stock to 2 -    bookmarks. This is your backing piece.

2. Next, cut two bookmark mats from one piece of card stock at

3. With the scrap piece of white paper, lightly tape your bookmark mats down to hold them in place.

4. With your dauber, ink it up with the colors of your choice. I used pink, purple, and a green.


5. In a circular motion, begin daubing your ink onto the bookmark mat. Blending the ink as you go.


6. When you have finished, this is what they look like.


7. Next cut two pieces of white card stock to match the stamp size you are using. I do this two ways. I either stamp the image on a piece of card stock and cut them out. Or I cut two pieces of card stock and stamp, and then cut the excess. I do not measure this part because you may not have the same stamp I am using and need to use another. Just remember to use a stamp that will fit on your bookmark size!


8. Using Staz-on Jet Black ink, stamp your image onto the two pieces of card stock.


9. Using tape, adhere them onto the bookmark mat. I did a centered one and an off centered one.


10. Now flip your bookmark mats over and put tape on them. You can see the scrap piece I used on the left! Adhere them to your bookmark base.


And you are done!


Now, you can laminate these bookmarks if you wish or add ribbon like shown last weekend. I did laminate these like I do all my bookmarks. It extends their life.

Happy Crafting!

Saturday, January 24, 2015

Another Scrappy Saturday - Ribbon and Bookmarks - Photo Heavy

Okay! You may have noticed that I have been making a lot of bookmarks in the last few months. *shifty eyes* I do not have a problem. I promise. LOL! But, I do have a lot of nieces, nephews, sisters, cousins, and such who love to read and who I needed to make gifts for. This week's bookmarks made on Monday were lacking the ribbon part. So I wanted to use some scrap ribbon to add some.

On one trip to my local Dollar Tree, I found some beautiful gossamer pink ribbon. It sparkles! It was the closest color I could find in my stash that relatively matched the color scheme of the tie-dyed bookmarks. So I decided to give it a try. Here's a quick tutorial on adding ribbon to your bookmarks.

*Note* This post contains a sneak peak into next week's Scrappy Saturday project!

Materials
Finished bookmark
Hole punch (standard size)
Ribbon


1. Punch a hole near the top of the bookmark. In the photo below, you can see that I punched one slightly higher than the other. I found that it looked better in the end product, but both still look really good.


2. Take ribbon and fold it in half. With the ends, fold them in half and half again. It should be able to fit into the hole.


3. Insert the ribbon into the hole from the back of the bookmark.


4. Pull the ribbon until half of both ends are on each side.


5. Insert the ends of the ribbon through the loop.


6. Now pull tight. Cut the ribbon to a shorter length if you wish.


Here's the finished product. Two bookmarks with gossamer ribbon for my two older nieces.


Now that you have a tutorial on how to add ribbon to your bookmarks, you can effectively add ribbon to any project similar to this.

Wishing you a happy crafting day,
Sarah

Saturday, January 17, 2015

Another Scrappy Saturday - A Barbie Art Piece - Photo Heavy

Another Scrappy Saturday was an interesting post created in December of 2014 to share with my readers a great use for scraps. Like any crafter, scraps are a by product and either a) take up so much space or b) given away to someone else. My goal in 2015 is to use scraps more frequently to make the most of my money and my materials. The second week of January has the theme of Barbie.

I have spoken previously about not having a craft store less than 50 minutes away from me, so what I have found comes from local stores like Goodwill (great bargains), Walmart (unfortunately), Dollar Tree (great place for ribbon), Lowes (yep), and The Dollar General. We have a small store named Fred's that has a few good deals as well. Because I am somewhat limited in what I can use, it requires me to be a little bit more crafty.

This week's Scrappy Saturday is a Barbie Art for her dream house. Let's face it. Barbie's Dream house when bought in the stores is super expensive. The art inside comes in the form of stickers. It's a little unappealing. For crafters, this is an easy fix!

Because I craft with multiple mediums, I chose to create a piece of art for Barbie's dream house using foam board and designer paper. I have seen multiple printable art pieces for miniature dollhouses, but I choose to use my scraps to make them.

Be forewarned. I did not take any measurements. I slapped it together quickly, but I will show the pictures and how I accomplished them.

Here's the list:


Materials:
Two pieces of foam board
2 way glue for adhering paper (or hot glue if you wish)
Some thread or yarn
6x6 or smaller pieces of designer paper (2)
Scissors

To begin, cut two sizes of foam board with scissors. I didn't worry about getting the shape exact. I got two rectangles. (Not pictured)

Next cut two pieces of designer paper larger than your foam board pieces.


Cut the corners out of the paper. Pictured below. I didn't worry about 90 degree angles.


Put glue on the flaps and fold them onto the foam board. Remember to press firmly until the glue adheres. (Not Pictured) Repeat for all four sides.

Next, cut two pieces of white card stock to fit the back and two pieces of string/yarn/ribbon to hang your art pieces.


Place a small dot of glue on the back to hold the thread in place. Place glue on the piece of card stock and center on the back of the art piece and press firmly.


This is how they will look after this step.


And now you have two art pieces to hang on the wall of your Barbie house.


If you are using a wooden Barbie house, you can use some gold or silver thumb tacks to hold them on the wall. These are light weight art pieces that allows you to create any number of pieces to match the decor or personalize your child's play house.

Sunday, January 11, 2015

Revealing the Theme - Barbie

Every Sunday in the year of 2015, I will be releasing a post that shows the theme of the week. The projects presented that week will be following that particular theme. It may follow a particular type of craft. It may be on a particular topic. Or it could end up completely random. What is important is that I will be focusing on a few goals this year to make this blog easier to follow. The 12 Weeks of Christmas format in 2014 was an easy to read, follow, and complete format. That is the general idea.

Goal 1
I want to use all my scraps to make the most of my money and my materials.

Goal 2
I want to finish some of the patterns in my arsenal. Some only need to be typed up!

Goal 3
Have at least three posts every week for my blog.


These are not horrible goals. In fact, they are pretty easy to accomplish. Here's how the blog posts will look like.

Sunday - Release of the Weekly Theme
Monday - Make it Monday, where I will go in-depth on the project
Thursday - Throwback Thursday, where pictures of past projects pop up
Saturday - Another Scrappy Saturday, where I use scraps to do a project
Other days - Releases of patterns or deals

Some of these days may have free patterns. Some may be projects seen on other sites. There will be no set project choice for any week.

The first week of the year actually begins today. The theme is one that I have always enjoyed having.

Barbie

Stay tuned to the following week to see what projects come up. I can provide just one small detail. There will be a free pattern this week.

Wednesday, December 17, 2014

Another Scrappy Project - Bookmarks 3

I feel this may become a theme in 2015 - Another Scrappy Project. It seems like an amazing concept that takes scraps and turns them into new items. So......

Oh yes, bookmarks. Number 3. LOL!

What I found interesting about this bunch is that I used the same background color. I took one piece of cream colored 8.5 by 11 paper and cut it in half long ways. That meant the paper was 4 1/4 by 11. I then cut each length into 2 inch pieces of paper. That made 10 bookmark size pieces.

The scrap paper I cut into 4 x 1 3/4 to fit. That gave a small clearance of 1/4 on all sides in most cases. Some I cut down to stamp. Here's the photos:


The green chevron paper did NOT want to be photographed. 


As you can see, the Thinking of You stamp has scrap paper a little shorter to allow for stamping directly on the base paper.


What would you like to see done with scraps? I am planning on doing a section with crochet and other such crafts. This new theme and concept will not be just paper crafts!

Sarah

Tuesday, December 16, 2014

Another Scrappy Project - Bookmarks 2

Apparently this is a new and exciting thing for me. Using up scraps has become a way for me to expand my mind into creating new unions. And, it is an AWESOME way to reduce unused materials. Here's the next batch of bookmarks. These are all varying in size and shape to utilize the most of the scrap paper.


These are the pretty papers I found in my scrap box. I was almost tempted to search through my pattern books for more just so I could make cards to match. I resisted the temptation since I wanted to just use scraps!


Here's the first batch of true Christmas bookmarks. I am sure these will make their way into some gift bags for my nieces and nephew this Christmas. 


What I love about making bookmarks and using scraps is that you can allow your mind to wander. It is a completely easy craft to do. I spent so little time actually piecing these together. I believe the longest part was making sure there was no tiny paper fibers on the outside because my paper cutter is weird. That means someone with a great paper cutter can whip these out quickly. If you don't have a paper cutter, feel free to do this with a ruler and scissors. It is completely do-able. 

Sending positive crafting vibes,
Sarah

Sunday, December 14, 2014

Another Scrappy Project - Stacie Granny Square Blanket

In the early hours of the night, I was freezing and decided to start a project. What started out as a blanket set for Barbie, Skipper, and Stacie ended up with just one...for Stacie...because it's granny square. LOL! I started with white and yellow yarn to create small, one row granny squares. I chose a G hook to make them as small as my hands could handle.

I will admit readily that I have never accomplished a granny square project the last thirteen years of crocheting. I will also readily admit that I may not ever do one again after I attached 15 small granny squares and weaved in the ends. LOL! That was so much work for just a tiny little blanket. It looks entirely cute, but geez...so...much....work.

The size is 5 x 3 with two rows of granny around it.


Before the edging.


Finished with edging.


As you can see, the Stacie doll I am using is one of the modern Stacies. She is taller than the older dolls. So using this method will fit any Stacie doll, past and present. Middle of the night project does equal less than optimal pictures, but you get the idea.

Saturday, December 13, 2014

Saturday's Christmas Craft - What Do You Do With Scraps?

When I think about my year as a crafter, I realize that I have untold amount of scraps all over the craft room (and perhaps the house). That includes yarn, ribbon, paper, and sequins. Everything I have used has some sort of scraps. Without being wasteful, I squirrel them away in hopes I can use them in a future project. And sometimes, that "future" doesn't come. So as I was thinking about what I had and what type of things I can make with them, my mind fell on the paper scraps that keep piling up.

Now, I am sure those who exclusively do cards have a larger pile of scraps than I do, but what I have is enough for many of today's craft. Several of them! I realize that I am just getting started. Would you like to see what you can do with your scraps in time for Christmas and able to make many at once?


Yep! Bookmarks! All shapes. All sizes. And in varying patterns. Take a look.


I spent about a hour (including the time it took to search) completing 13 bookmarks with scraps. I only used one new sheet of paper to match the deep purple pattern paper as I didn't have any scraps. This time also included finding my laminating paper and laminator to make these bookmarks last.

Who would have thought? It is one of the most stressful times of the year for crafters and here I found a great way to destash and enjoy a few quick projects.

I do not have any specifications for these bookmarks. It literally depended on the size and shape of the scrap paper. Allow your imagination to soar. If you want to add something else to this, use a hole punch at the top and add some ribbon.

What are you working on this Saturday?
Sarah