Showing posts with label small business. Show all posts

Monday, April 21, 2014

Make it Monday - Sled Ornament

I announced this pattern on Saturday as part of my "Share it Saturday" routine! But first things first, here is the material list again:


  • glue gun
  • glue sticks
  • popsicle sticks (9 - 8 for sled and 1 just in case)
  • sturdy scissors
  • paint color of choice
  • scrap paper or newspaper
  • paint brush
  • yarn/twine/ribbon


 While this is a REALLY early Christmas ornament, I am preparing my booth with products for Autumn shows. The goal I have is to have many choices to purchase and have fun while I make them. I saw pictures of a similar sled on Pinterest and developed my own.

*Note: While this is a somewhat kid friendly project, I would remind everyone to use safety goggles and allow an adult to deal with the hot glue.

*Note: Although this project is pretty quick, you must leave time to dry.

1. Plug in glue gun to heat up. Be sure to place it on a piece of scrap paper to catch any dripping glue.

2. Cut one stick into two equal parts with a small overage. Two of these parts will fit across the bulk of the sled.


3. Place 5 popsicle sticks next to each other with the middle stick the highest, the next layer down just slightly, and the last two down further.


4. Using hot glue, place a small line of glue near the upper part of the sled and place 1 of the support beams from step 2 on top. I squished mine down to create a better hold. Repeat further down the sled.


5. Place a small bead of glue on each support beams at the very end and place the runner, holding in place until the glue hardens. Repeat for opposite side.


6. Allow time to dry.

7. Using paint brush, paint the sled on one side. Let dry. Repeat on opposite side. Let dry.


8. After cutting the ribbon/twine/yarn to the desired length for the hanger, place a small bead of hot glue next to the top support brace on the underside of the sled. Quickly place one end of your hanger into the glue. Repeat on opposite side.


You can obviously embellish this sled how you want. I have ideas to put names and the year on the sled so that whoever receives the ornament will have a date for memories in the future. I would love to see any projects you do with this tutorial. You can send the photos to smchatton.writer@gmail.com or visit my Facebook page, Dande Creations, to share.

I found packages of popsicle sticks at my local Dollar General on sale 25% off. I bought 5 packs for $3.75. I did pick up a new pack of glue sticks a few weeks ago, but you hardly use half a stick for just one sled. I also had crochet thread to create the hanger; however, the price is very low with the amount you use. Paint was also relatively cheap. For me, it was free. I had purchased paint samples at Lowes when we painted our kitchen and it was the perfect time to use them. The beautiful, deep blue was a perfect winter-y/Christmas-y color.

Costs

8 Popsicle sticks - $0.08 on sale
Hot glue stick - $0.16
Thread - Free
Paint - $0.10
-------------
$0.34 per sled
Round up to $0.40 for thread (generous)

So for 40 cents, you have a sled.

My packs of sticks had 80 sticks so I can get 10 sleds from one pack! What a great, frugal way to make gifts for the holidays, crafts for the kids, or products to add to your holiday craft booth!

Happy Crafting,
Sarah


Saturday, April 19, 2014

Share it Saturday - Upcoming project

This week I thought I would give a preview of what I will be doing for my next Make it Monday project. I saw this idea on Pinterest recently and wanted to give it a try. For a few years, I have been a big supporter of giving ornaments for Christmas. Last year I gave mittens and my Medallion ornament to most of my family members as a handmade sentiment for the season. This year, I do have similar plans to provide handmade ornaments; however, I have not decided quite what I want to do.

As I prepare for Fall, I know that I need and want to add Christmas ornaments to the roster. (The list gets longer each day.) When I saw this pin, I thought...well that is a relatively easy project that looks adorable in the tree. So, I tried it. The pin did not include a tutorial as the blog just contained multiple pictures. So going with a rough idea, I created a cute version.

Here's the preview!


Can you guess what it is?

Now, I wanted to provide a material list.


  • glue gun
  • glue sticks
  • popsicle sticks - at least 9 (8 for sled and 1 just in case)
  • scissors
  • paint of choice - I am going to use some brown I have sitting aside
  • paint brush
  • scrap paper or newspaper
  • twine/yarn/ribbon

I have not decided what I am going to use for hanging, but I will decide before Monday. One thing I have seen is that this project is easily transformed so children can join in. Instead of hot glue, you could use Elmer's or similar glue. The drying time would just be greater.

The goal for me was a quick, simple project that make a good end product and obviously, a great ornament. I hope you visit on Monday to see how to put this together!

What are your crafting plans this weekend?
Sarah

Friday, April 18, 2014

Some New Cards

With a week off, I have been attempting to get a little bit of everything done. I am watching my seedlings grow. Working on the containers that are out on the porch. But the best thing I have done this week is work more on my products for Fall. I have a project to show you tomorrow that is particularly fun. For today, I just want to share some of the cards I came up with this week. Yes, some of them will have similar stamps. There happens to be two or three I really love.


I have gotten a few new toys including a cloud embossing folder. So far, I have only made one or two designs with it. I plan to add more. I also have four stamp sets on the way including a cute little Jack and Jill combo that might become my favorite stamps. I cannot wait to try them.

The goal this week is using leftovers and scraps to make cards. In the space of just a little bit, I have a stack of scrap paper really high! They are turning out nicely I think.

Have a great Friday!
Sarah

Thursday, April 10, 2014

Throwback Thursday

It is that time of the week where I get to show an early picture or something as a throwback to older times! This week's throwback photo is:


Dolly

This was my second or third doll. It was for a friend's daughter who wanted a doll. It was relatively easy to crochet, but it took a while. Of course, looking at it 3 years later I know that I could and would change things like the eyes, the hair, and add more stuffing.

The important thing is...the little girl liked it. So I was happy!

Thanks for going back with me
Sarah

Wednesday, April 9, 2014

What am I working on....

We made the decision to try to sell this fall at our local market and start working on building up stock to participate in future craft fairs. So this morning, I went through what I had already made and packaged to make a list of what I need to make. Anyone who has done this knows how daunting it can be - the inventory and the lack of inventory.

Yes, I know it is April. But, I started working on Fall/Christmas stock because some of them are a) easy to make, b) great in between project fillers, and c) a little elaborate. Yesterday, I posted that I was struggling with what to do next, so I started on something I enjoy - ornaments. My goal is a bit on the larger side, but that's okay. Better to shoot for the moon than shoot for just a few feet in the air.

I wanted to start small because it was late in the night. This is what I did last night:

Christmas Stocking Ornament in Dark Orchid

This morning, after inventory I chose to do my own pattern - Medallion Christmas Ornaments. I ended up developing two other sizes, which I might release as a e-book closer to Christmas! Today, I do not plan on actually creating the medallions by sewing them together. I am just making the sides. I've gotten 4 sets of sides done so far - with many interruptions!


Aren't they lovely? The coloring is off, but they are red and green. I plan on making many colors and having some for purchase in my Etsy shop closer to Christmas.

What are you working on today?
Sarah

Tuesday, April 8, 2014

A Quiet Day here

As night has just come for us here in East TN, I am listening to the sounds of the bugs and enjoying the peaceful feeling one can have at the end of a day. Today was quite different than yesterday. There was no scrambling around. No errands. No preparing projects or seeds. There was no shoveling dirt or cutting my finger on rocks. No traffic except for the occasional car heading home. Just a chill in the air, bugs singing their songs, and a crafter contemplating her next project.

It was a peaceful day and evening. In this day and age, it is difficult to imagine someone having a day like this...or the very simple truth of realizing the day, enjoying it, and being thankful. Yet, here I am tonight enjoying it.

For a crocheter, not picking up her hook in a day seems like a hypocritical move. It's like a human needs air, so shall a crocheter need yarn and her hook. This comes a day after buying 6 new skeins of yarn - 5 of which are beautiful and "Spring-y."

One issue I seem to be having is making decisions regarding the selling of my products. For months I have been struggling with whether I should or should not sell. Anyone who has faced this decision will tell you - it sure is a difficult decision. I live in a very crafty-artsy area. There are many different types of artists within 20 miles of my location and a huge stretch of road that loops back to Gatlinburg with tons of these artist's workshops and shops!

How does one compete with that? Correction: How does someone like me, with no workshop or shop, compete with individuals who have been working years on their brands, their shops, and building their workshops up with the best equipment?

Well...I can't! That is what got me down. I sold my tent. I sold my big table. And all I have is my product, a yellow queen sized sheet, and a 5 foot table. I was down. I was frustrated with myself. And a lot of what was happening was out of my control!

So when I started to see a meme that talked about how long it took to create a brand and build a small business, I started questioning my decisions. Everything around me and everything that was happening seemed to be something else that was building me back up - a video on building brands, other crafters telling me how long and hard they worked, seeing the determination to continue, and repeatedly seeing that meme...in MANY places.

What can one do if all the signs are saying "YOU STOPPED TO EARLY. JUMP BACK ON THE PONY AND RIDE INTO THE WIND?"

Well...you listen of course! So tonight, I am attempting to create a plan to get myself back into the game. We are adding products that have nothing to do with crochet like beauty products and soaps. Maybe candles? Just on a small scale at first. I am not quite sure how it will end...or if I will end up failing again; however, I do know that like all the great little businesses out there who have carved a name for themselves, I will continue to fail until I succeed!

Wishing you success (even after repeated failures)
Sarah 

Monday, April 7, 2014

Make it Monday: Photo box

One of the  things that is time consuming in a crochet (or any hobby business) is setting up and taking photographs. As I mentioned previously, I am in the process of retaking photos and remaking items so that I can create better photos. The little Easter set-up for Barbie was not as difficult to make; however, it was time consuming taking multiple photos of one item, hoping the light was right, struggling to get the Barbie to stand right...you name it, it took forever.

While I am happy with the way that particular set of photos turned out, I wanted to create a space that was specifically for photographs with a white background and bright lights. Ultimately, I wanted no distractions and a bright pop for my items.

As I was searching for blueprints for a wooden photo box, I came across a bit of a cheaper version. You can view the instructions here. That was up my alley! Cheap, easily made, and did not require large tools that I would have to borrow. So, my goal for Monday is to pick up two desk lamps and some foam board to make this.

My budget: 30 dollars

Here's the breakdown

Foam board: $1.00 a piece
Total: $5.00
-Found at my local Dollar General

Razor cutter: $0.00
I have three at home.

2 Desk Lamps: $10.97
-Found at Walmart. One of which was in clearance for $5.00 and a clip-on for $5.97.

Tape: $0.00
-I have a roll of duct tape at my house.

White Printer Paper: $0.00
-Also have (But didn't use, yet)

Digital Camera $0.00
-Have it

As I am the type of girl to read instructions and then take my own path, I chose to use 20 inch measurements and cut 4 of the 5 boards down to that.

This is the 4 out of 5 cut down.

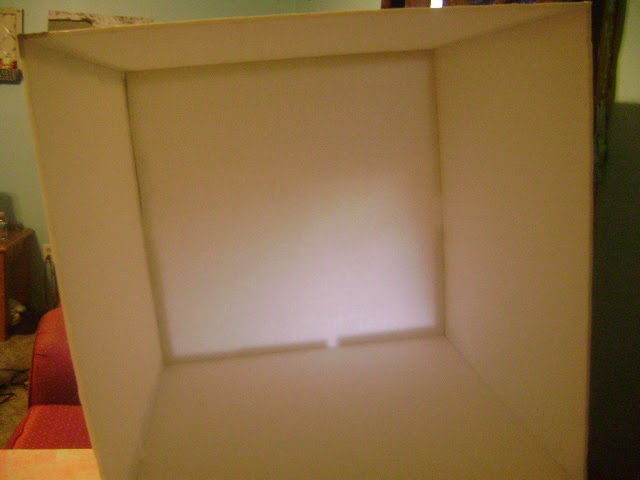
 Then, I started to cut the tape and assemble the pieces edge to edge. Now, with one person this is doable; however, I did start to get frustrated when things started to fall down. I used the wall as a support. When I completed the four out of 5 pieces, I attached the bottom. It helped to stick the tape to the edge of the desk and have it ready.


Unlighted and no flash on the cube! You can see the tape.


With the flash, you can no longer see the tape, but you can see the seams.


The finished setup. These are the lamps I found really cheap and on clearance.

I would have to say that I accomplished this box within a hour with minimal frustration. The ease of completing it was pretty nice. As you can see, it is a cheaply made photo box; however, at the price of 5 dollars and a little tape you have a somewhat, well lit photo box. In the next week, I plan on putting something along the seams to fix it.

Now, you know I did not just take a photo of the box and move on! I had to try it on one of my products. I have to say, straight up I would normally have something under this item to lift it up as it photographs better that way. I used every function on my camera (not an expensive one) to take photos and see the results. When I found one that looked good with the lights on, I took it with the lights off and flash. Here are the results:


Without lights/flash, before edit


Without lights, after edit


With Lights/Flash, Before Edit


With Lights/Flash, After Edit


As you can see by these pictures, the clarity on the edited with lights photo is far superior to the others. Even without the lights and with a flash, the clarity and color does not come close to popping like the final picture!

Total Cost without tax: $15.97

If you need a photo box and need one on the cheap, I would highly suggest this type. Note: If you do not have the materials I do, this will cost you more. The box cutter and tape are not that expensive; however, the price will rise when you add other things.

THUMBS UP!

What do you think of the photo box?
Are you going to try to make one?
Sarah

Saturday, April 5, 2014

The Essence of What I do

There was something weighing on my mind last night and the last few months. Something large that seems to be pushing at my soul. It's about my life, my passions, and about my business. I have struggled like many other small business owners in this economy. I have struggled with other crocheters undercutting my prices or offering the same items. For months, the struggles I faced trying to build up a reputation as a good designer and as a good seller seemed to bring me down further instead of uplift me. The fear of not succeeding weighed me perhaps the most.

What if I spent all this money and no one buys?

What if I upgrade this and redo that with no interest?

What if my customers have no interest in my patterns or items?

As months went by, those stones in my basket became heavier and heavier to bare. I continued to doubt myself. I changed this thing and that thing to increase business. I offered deal after deal with not one bite.

Through all that, I continued to see a quote about how long it really took to build a business and a brand. How many hours, heartaches, struggles, changes, and frustrations it took to build a worth while business....

Last night, it dawned on me.

I do not crochet, craft, or write because of other people. I do not sell items. I do not sell my time, my materials, or even a bunch of yarn knots made with a metal hook. I make and sell memories. I make and sell a connection between two people that will last a lifetime. I make and sell heirloom ornaments and dolls...that will withstand more than a few weeks of play at Christmas time. I make and sell that smile exchanged between two people....and the hug...and the heartfelt gratitude.

Most handmade sellers do the same. When you factor in the fees, the listing amounts, the time, energy, material costs...even the gas to get the materials, some of us barely break even trying to keep up with trends and the "best" price.

Well, no more! I want to maintain the very essence of why I do what I do - the memories, the hugs, the laughter, the smiles, the connection, and the heirloom that touches more than one generation.

So thank you, for sharing that with me. It means more than you know!


With lots of love,
Sarah