Showing posts with label paper craft. Show all posts

Thursday, May 21, 2015

Throwback Thursday - Journals and Writing

One of the first things I did when I was preparing for a fall craft fair and after my foray into paper crafting was cover a composition notebook. Since school days, composition notebooks were used to write down thoughts and work with writing prompts. Children on a daily basis continue to do this as a way to practice writing and grow as individuals.

In high school, my English professor required us to write daily as a way to reduce our stress and to talk about anything we wanted. It could be about boyfriend troubles. It could be about life. Or about our jobs. It could be anything under the sun. I didn't understand how very calming and relaxing writing without an audience was. I do now, which is why I am sharing some of the composition books I covered.


Each of these have their own qualities and match someone's traits. Thankfully, they were all purchased! It showed me that there are still many people who use the composition notebook as a portal to write their thoughts.

*Suggestion* Buy one of these for your child at home. Allow them to decorate it. And start writing a note to them each day with their reply on the back page. It will bring you closer and encourage them to confide in you.

Sarah

Monday, May 18, 2015

Make it Monday - Binding a Book - Photo Heavy

This project was done months in advance because it was created for my mother's birthday. Her birthday falls in December, close to Christmas. We had plans to go out for lunch, but I wanted to make something special for her. Something I took time on. I have the luck to have a mother who truly loves everything homemade or anything given to her. Her humbleness stuns me every time. In recent months, she had told me that she had been studying her religious text. So this Make it Monday project comes from the desire to help her progress.

Yep! I bound a book. Two of them in fact. And I would have to say that they are more along the lines of a booklet. The ones I have made are meant for note taking or other such things. You can obviously create larger books than the ones I completed. All you would need to do is puncture the paper a little at a time to accomplish this. And cut the designer paper larger to cover the added paper.

Materials
Paper cutter
Designer paper or colored paper
4-6 sheets of white copier paper
needle
thread
scissors

Here are the instructions on how to accomplish this project:

1. Take 4-6 sheets of white copier paper and fold them in half. Be sure to press the bent side with a straight edge or a bone folder.


2. Cut the designer paper to 8.5 x 11 to fit over the paper. You can also add 1/4 of an inch on either side to overcompensate. (Excuse my crafter's mess - This was around Christmas time.)


3. Fold the designer paper over the copier paper. Remember to press the seam with a straight edge.


4. Take your threaded needle and puncture the center of the paper from the inside. Leave a longer tail because you will need to tie the ends together.


5. When you bring the needle and thread out, puncture another hole about 2-3 inches away from the center. I went a little further on this one than I did my first one.


6. Take the needle through the paper and back across the center to the opposite side. I didn't measure. I just eyed the space to see what looked right. They are about equal distance from the center. Puncture the paper and pull the needle to the outside of the booklet again.


7. Finally, push the needle through the center hole. Pull tight. Then cut the needle off leaving a long tail to tie.


 8. Tie the two ends together twice and cut a majority of the excess. Fold the booklet.

Congrats! You just made a booklet. Here's the pictures of the two finished booklets I completed. I chose not to embellish them as I knew that my mother would love them, but you can embellish them with ribbon or stamps or whatever you wanted.


These are bookmarks I made to match the booklets.


Booklets and bookmarks together.


Finished and packaged. If you are wondering, I took a 8 x 10 cello bag I purchased from JoAnn's online (with a self adhesive closure), added the booklets and bookmarks, and closed it. I then took a piece of brown cardstock (scrap) and folded it over. I stapled it onto the cello bag. I used a scrap piece of the flower designer paper to cover the staples.


I hope you have found this tutorial informative and choose to do it yourself. It is relatively easy. It was super quick. I was able to accomplish it within ten minutes (minus the bookmark part since I laminated). A bit of that time was trying to thread a needle....because my threader broke. So, you can accomplish this project in less than 10 minutes without a doubt.

Take some time to create some homemade books and bookmarks for someone you care about! The gifts don't have to be expensive, especially when they come from your heart.

Sarah
Saturday, February 14, 2015

Another Scrappy Saturday - V-day Cards for Kids

Happy Valentine's Day! What a great day for Scrappy Saturday to fall on! I am sure that you are more than ready for the holiday to be over. Don't worry...by the time today is done Easter will have already made its way onto the store shelves. It is getting a bit crazy. And that is coming from a woman who loves holidays. On to today's project...

Okay. I will admit readily that not everything used in these cards are scraps, but some of it is. So it qualifies by a hair. Right?

My inspiration? Well...love and hearts. (gasp) Of course...to match the holiday.

What is the one thing that you might forget to purchase for your children on V-day? Well, that would be small cards to give away for their class. I remember a time when we actually made the cards to give to each other. Only the richer students purchased cards, but I was super happy to get the homemade ones. So when I was thinking of a quick and easy Scrappy Saturday project, this was it! Who wouldn't enjoy making these?


Materials:
Paper cutter
Scissors
Roller tape
Scrap sheets of plain colored card stock (I used red, dark red, pink, and blue)
Scrap sheets of designer paper (I used hearts)
An I love you stamp or similar Valentine's stamp
A (To and From) stamp
Things to embellish if you wish


Dimensions

Plain Colored Card stock - 4 x 2 1/2
Designer Paper - 3 3/4 x 2 1/4

1. Cut all paper first. I made 8 pretty quickly. These are so small that you can make a bunch up with ease.


2. Turn the plain colored card stock over and stamp with the To and From stamps. At this time, also stamp the designer paper with your V-day stamp of choice. Mine is an I (heart) you stamp.


3.  With roller tape, adhere the designer paper to the backing.


4. Congrats, you can embellish now if you wish.


I did choose to embellish with some heart puffy stickers, ribbon, glitter tape, and rhinestones.


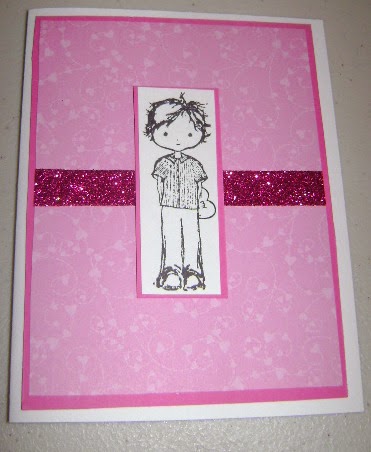
Here they are finished. The center one is partly ripped because I pulled too hard on the ribbon. I do not have children, so these are heading to my little nieces and nephews for a surprise piece of mail from Aunt Sarah. But you do not have to use ribbon to embellish. The point is to create quick and easy V-day cards for your child's class. You can go a step further and stamp the outside with an open stamp that they can color! Let your children help!


Happy Valentine's Day
Sarah

Monday, February 9, 2015

Make it Monday - V-day Cards

Yep! You read that right. Cards! I recently purchased two paper packs. One is 6 x 6 paper and one is 4 x 7 paper. They have no particular theme which makes them perfect for everyday card making. I was inspired when I found three pieces of "heart" papers inside. There was one more that was blue and green, but it remained unused. It would work perfectly for a more "manly" love card. I may make one since I have two men in my life that I love and who I appreciate.

These cards are pretty fast. Once you get the hang of making cards, they come together very quickly. Cut all the mats at once. And have everything at hand. You do NOT need a lot of things to accomplish professional looking cards. I do not have much in the way of stamping materials, but I do purchase some every once in a while. Think outside the box!

Let's get to the project.

Materials
Paper cutter
Scissors
Roller tape
Pop dots
Ribbon
Glitter tape
White card stock for card bases
Red and Pink card stock for Layer 1
Pattern paper for layer 2
Small amount of white card stock for stamps
Love themed stamps
Small amount of red and pink card stock for stamp mat
Rhinestones

Here's the dimensions

Card - 4 1/4 x 5 1/2 when folded. Meaning 8 1/2 x 11 card stock cut in half.
Layer 1 - 4 x 5 1/4
Layer 2 - 3 3/4 x 5

I used 1 red Layer 1 and 2 pink layer 1. I also used three different Layer 2 pattern papers. All of them have a love/heart theme. I used 1 red stitch ribbon measured to around 12 inches. I used 2 pieces of glitter tape measured at 4 and 5 inches. The stamping I measured as I did it. This will vary for you based on the stamp you used.


Here's the first mat completed. This is the red version with red heart pattern paper and stitched red ribbon. 


This shows the pop dots I used to put the stamp on the mat.


Here's the finished product.

Because the layers and bases of this card are the same, I am not going to show the other three cards being made. I am going to show you the finished versions. So here's the other two cards.


(Prima Stamp)


(Sentiment Stamp)


These cards were fun to make and suit my "love" of pink. What are you crafting for V-day?

Sarah

Saturday, February 7, 2015

Another Scrappy Saturday - A Chocolate Colored Card - Photo Heavy

Let's face it. The last two months of 2014 had us faced with the temptation of calorie laden foods. Then January hit and we were (hopefully) able to get back into the swing of proper eating. And then bam! February hits and every store is laden with more tempting chocolates and candies for a holiday about Love. So when the first week of February ended up being themed chocolate, I had no clue I would be caving and doing a special Food edition of Make it Monday to break the cycle of normal calorie intake! So in an attempt to reign that crazy haired, crazy eyed, Chocolate maniac in, I am going to make a card for Scrappy Saturday.

A chocolate colored card. One without calories. In fact, it burns calories!

The inspiration is the wrapper of a chocolate bar. The sentiment and stamp was chosen to match a Dove chocolate piece that has an inspirational saying inside. (I so love Dove milk chocolate. Yum!)


Materials:
A paper cutter
Scissors
Roller Tape
Scott's Magic Tape (transparent or similar brand)
Acrylic block
Stamp set
Staz-on Brown Ink
Tim Holtz Distress ink in Walnut
A sponge (I use a makeup sponge - super cheap.)
Silver or gold thread
1 card base (white)- 5 1/2 x 4 1/4
Layer 1 (tan) - 5 1/4 x 4
Layer 2 (designer paper) - 5 x 3 3/4
Scrap piece of white paper
Scrap piece of tan paper for stamp mats


Remember: The stamps I use or the paper is relatively easy to change for what you have on hand. Use this as a guide.

Before starting - I cut all my papers and base to have them ready.

1. I started by stamping my sentiment and stamp on white card stock. I always stamp on a larger sheet and cut them out by hand.


2. Using Tim Holtz, Walnut Distress ink, I sponge around the outside edge of both stamped images to create a contrast on the tan background.


3. Adhere (roller tape) the stamped images to the tan background, and hand cut them out.


4. Here they are cut out.


5. Using a piece of Scott's tape, adhere the gold (or silver) thread onto the back of the designer paper.


6. Wrap it around how many ever times you wish. I chose five. Once you like the look, cut the thread and attach with another piece of tape on the back.


7. Using roller tape, attach Layer 2 to Layer 1. Then attach with roller tape to the card base.


8. Using pop dots or foam tape adhere your stamps to the front. I positioned my flower near the center of the card with the sentiment at the bottom. You could easily adhere the flower in the center and use the sentiment inside.


And that is my chocolate inspired card. Who couldn't use a push to enjoy life's moments? We all get lost in life sometimes. Having a push in the right direction is great!

Happy Saturday!
Sarah

Thursday, February 5, 2015

Throwback Thursday - The Color Chocolate

There is something about the color brown that pulls at my tension and allows me to just relax around it. Perhaps it is the connection between chocolate (the candy) and the chemical reactions it gives to humans that creates that relaxation. What I know is that I am the type of girl that loves chocolate and Tiffany blue together. So much in fact that my living room and bedroom have those color themes. 

When I make cards, I usually try to find a theme. It could start with the first layer color or a piece of ribbon. The Throwback card I am sharing today is one that I made around a stamp. I found this stamp and a few others in the clearance section of JoAnn's online. It was when I first started stamping. I instantly fell in love with the hand drawn feel of it. The lines are so delicate. And it just fit.


So I used the owl as inspiration, but stuck to creams and browns as my color theme. As you can see, it turned out to be a good choice. Chocolate on Chocolate on cream filled chocolate. This is my chocolate share for the week.

What is your go-to colors?

Monday, February 2, 2015

Happy Birthday Card

I mentioned in my previous PB cup post today that it is my hubby's birthday. In my crafting last week, I managed to covertly make him a birthday card to go with his surprise peanut butter cups made by my roommate and myself. I don't know about you, but I have a hard time figuring out "manly" cards. It is not like my husband is picky, but the paper I usually buy is not the right color scheme for men. I do have some fishing paper and such, but I have YET to see my husband with a fishing pole. I would be more likely to pick one up than him. LOL!

Recently, I purchased two new paper packs. One of them was a 6x6 pack and the other was a 4x7 pack. In the 6x6 pack, I found a blue streaked paper that seemed like a good choice to use. It is on the darker side, which meant I could use black as a mat and a ribbon (yep...ribbon for a man). What I added as an afterthought seems weird in hindsight, but...I did make the card with love.

I am not going to provide any dimensions or instructions on this card. I am just sharing something I made. It may provide some inspiration for that man in your life.

Here it is:


What I love about this is I chose to put the ribbon at an angle. It creates a unique look. Whether he likes it or not, I made it with my heart and lots of love.

Sarah

Saturday, January 31, 2015

Another Scrappy Saturday - Pigment Ink Bookmarks

Last Scrappy Saturday, I showed you how to embellish your bookmarks with some ribbon. The bookmarks shown in that post is what we are accomplishing today. I made these bookmarks before Christmas because they were a gift for two of my nieces. They fit into the theme of our week. Inspire Your Heart with Art.


The stamp used in these bookmarks is a flower with tons of hearts. Plus, I used the same technique as shown in Make it Monday! So you could easily make these two projects together and give a nice gift to someone who could use a pick me up.

Materials
Paper cutter or scissors
Ruler
Pen (if you don't use a paper cutter with a ruler attached)
Purple card stock
White card stock
A sheet of white copy paper
Sponge Daubers
Pigment ink
A stamp if you want that
StazOn Jet Black ink (for stamp)
Acrylic block (for stamp)
Roller Tape

1. Begin by cutting the purple card stock to 2 -    bookmarks. This is your backing piece.

2. Next, cut two bookmark mats from one piece of card stock at

3. With the scrap piece of white paper, lightly tape your bookmark mats down to hold them in place.

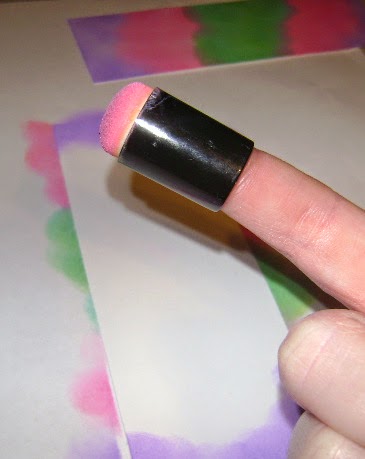
4. With your dauber, ink it up with the colors of your choice. I used pink, purple, and a green.


5. In a circular motion, begin daubing your ink onto the bookmark mat. Blending the ink as you go.


6. When you have finished, this is what they look like.


7. Next cut two pieces of white card stock to match the stamp size you are using. I do this two ways. I either stamp the image on a piece of card stock and cut them out. Or I cut two pieces of card stock and stamp, and then cut the excess. I do not measure this part because you may not have the same stamp I am using and need to use another. Just remember to use a stamp that will fit on your bookmark size!


8. Using Staz-on Jet Black ink, stamp your image onto the two pieces of card stock.


9. Using tape, adhere them onto the bookmark mat. I did a centered one and an off centered one.


10. Now flip your bookmark mats over and put tape on them. You can see the scrap piece I used on the left! Adhere them to your bookmark base.


And you are done!


Now, you can laminate these bookmarks if you wish or add ribbon like shown last weekend. I did laminate these like I do all my bookmarks. It extends their life.

Happy Crafting!